The patented low-pressure vacuum carburizing technology developed by France ECM has been applied in many large automobile companies and other machinery industries in Europe and America. According to the requirements of the workpiece layer, the computer simulation system Infracarb will calculate the time and cycle times of the carburizing and diffusion process, and the final simulation accuracy can reach ±5%. The ECM low pressure carburizing furnace introduced by our factory has been used for more than 10 years. Low pressure vacuum carburizing has many advantages over conventional controlled atmospheres, but these advantages can sometimes be disadvantages due to improper processing. This article mainly discusses the problems that arise during the use, for the reference of peers.

Jiangsu Shuanghuan Gear Co., Ltd. Hao Fenglin
Deformation problem
Since the parts are always under vacuum during the low-pressure vacuum carburizing (or carbonitriding) heat treatment, there is no oxygen atmosphere, so there is no internal oxidation, surface non-martensitic structure, black surface, etc. The surface alloying element is depleted and the surface hardenability is reduced. The surface hardness and surface residual stress level of the part will be significantly improved, which can significantly reduce the early failure of the surface of the part and improve the service life of the part.

We have developed a hollow shaft. Due to the large size of the shaft, the use of the atmosphere furnace will result in poor deformation consistency and increase the difficulty of debugging. At the same time, the multi-purpose furnace and the vacuum furnace were tested at the same time, and it was found that the deformation consistency of the vacuum furnace was superior to that of the multi-purpose furnace, so the product was processed in a vacuum furnace.
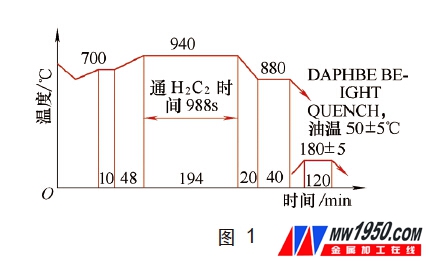
2. Crack problem
This product has been in mass production for about 3 years. The process is shown in Figure 1. Occasionally, there are few products broken from rounded corners. However, the crack rate of the products treated for a period of time is 10%, which brings huge losses to the company. Comparing the results of the heat treatment before and after the comparison, no significant difference was found, and the heat treatment test results of the cracked products met the requirements. The heat treatment clamping method has not changed as shown in Fig. 2. For the vacuum treated products, all non-destructive testing was performed first, no cracks were found, and cracks occurred after straightening. The cracked areas were in the R angle position indicated in Fig. 2, and the cracks are shown in Fig. 3. And there is no alarm for the product AE value that appears to be cracked. We test the size of the R angle, a total of 6 pieces are tested, the pattern is required to be 0.60~1.0mm, and the value of the detected crack workpiece is 0.60mm, 0.78mm, 0.85mm, 0.92mm, 0.65mm, 0.79mm, which meets the requirements, and Cracks appear in the upper, lower and middle diameters, indicating that the crack is independent of the R angle.
The results of the analysis are as follows:
(1) The workpiece is treated by vacuum furnace, the surface quality is good, the strength is high, the stress is large, and the straightening is prone to cracks and crushing.
(2) The workpiece reduces the depth of the hardened layer under acceptable conditions.
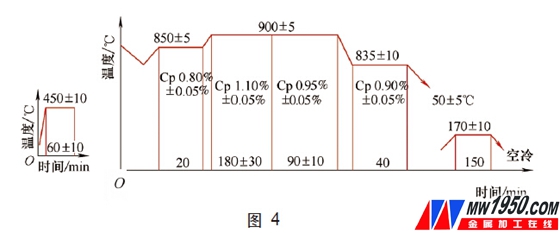
According to the existing similar products, such a large number of cracks are not found in the atmosphere furnace treatment, so it is considered that the atmosphere heat treatment is used, and there are defects acceptable to the customer after the surface heat treatment (non-martensitic ≤ 0.02%), and the toughness is good during straightening. . So we processed it in a multi-purpose furnace and it was 100% qualified after straightening. The process is shown in Figure 4.
3. Gearbox gear heat treatment problem
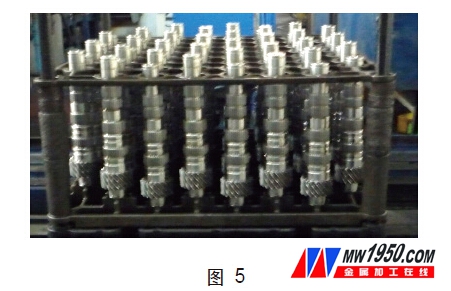
For the heat-treated automobile gearbox gear, it is found that the output shaft adopts the atmosphere furnace heat treatment deformation inconsistency is more obvious than the input shaft, and heat treatment test is performed for each batch of steel. Once a batch has not been tested, there is a risk that the heat treatment will be out of tolerance. The heat treatment clamping method of the continuous line is shown in Fig. 5, and the heat treatment process is shown in Fig. 6. The vacuum furnace heat treatment is clamped in the same way as the continuous line, and the heat treatment process is shown in Fig. 7.
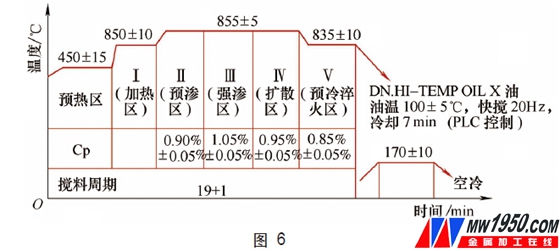
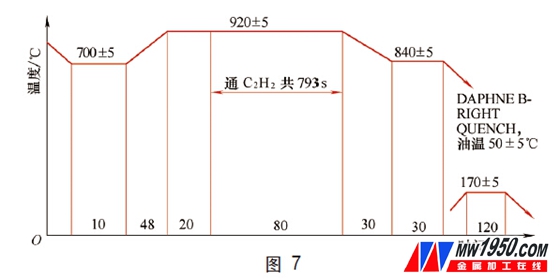
For the comparison between the vacuum furnace process and the continuous line process, it can be seen that the continuous line has a pretreatment of (450 ± 10) ° C, while the vacuum furnace has a uniform temperature of (700 ± 5) ° C, and the 700 ° C stress relief ratio is eliminated by 450 ° C. It will be better. Therefore, as long as the hardenability of the steel is within the acceptable range, the quality after the heat treatment is very stable. Sometimes the products processed in the atmosphere furnace are out of shape, and the remaining products are qualified in the vacuum furnace. However, due to the high or poor tolerance of the material hardenability, the workpiece is bent after heat treatment, and the failure rate of the straightening sometimes reaches 10%. Therefore, the nitrogen gas quenching is used, and the deformation after quenching is irregular, the deformation is larger, and the straightening is unqualified. The rate did not improve. At this time, for the products without shaving, the deformation test of the quenching oil with slow cooling speed is repeated to the continuous line, and the pass rate of the product straightening is basically 100%. Due to the vacuum furnace treatment, a de-stressed temperature section can be added at the beginning, so the treated product, whether it is a disk tooth or a shaft tooth, has a significantly smaller deviation than the continuous line and multi-purpose furnace treatment. For the toothed tooth curve curve, the apparent consistency is much better.
4. Vacuum furnace carburizing medium
The vacuum furnace carburizing medium can be selected from acetylene or propane. Propane is sometimes used instead of acetylene. However, in the long-term production, it was found that propane is very prone to tar, and there is no hardened layer in the area where the workpiece is in contact with the tooling. There is no problem for the rest of the area. The nozzle was cleaned and the acetylene treatment was used. No similar situation occurred.
The above situation is expected to be used for the manufacturers who use the equipment.
Dongguan HengTaichang Doors Co, Ltd. , https://www.dghtcdoors.com