I. Introduction
Improving the efficiency of CNC machine tools is a common concern at present. With the introduction of information, the operating rate of foreign CNC machine tools in the two-shift system is 60% to 70%, and domestically, it can only reach 20% to 30%. The reasons for the low utilization rate of CNC machine tools are summarized in the management and technical aspects. The selection of tools and cutting parameters is one of the main technical problems of CNC machining. For example, a 18000 rpm machine tool uses a mm10mm high-speed steel tool to machine aluminum alloy. The maximum cutting speed allowed by the tool is 300mm/min, and the machine speed is 8750r/min. For the same size alloy knives, the maximum cutting speed allowed by the tool can reach 600mm. /min is even higher, the machine speed can reach 17510r / min, it is obvious that this machine is not suitable for high-speed rigid tools. If the machine tool, machining tool and machining object have been clarified, it is of practical significance to study how to correctly select the cutting parameters to improve the machining efficiency and reduce the machining cost.
What is the correct cutting parameter, the author believes that it should be a set of cutting parameters that maximize the material removal rate for a specific machine tool, a specific tool and tool holder, and a specific processing material to meet the processing quality of the part. How to determine the parameters of this group, some people have proposed the method of selecting the optimal milling parameters through computer optimization design. At present, there are already reports in the literature that modern cutting process simulation and optimization techniques can be utilized, and reasonable mathematical models and engineering are used on the basis of a small number of experiments. Advanced methods such as analysis and simulation to quickly obtain ideal cutting parameter data. For us, the type of tool is limited, and several commonly used tools can basically achieve 90% of the machining amount. In this case, it is more realistic to obtain the correct cutting parameters of these tools by cutting test method. means.
Second, the purpose and method of the test
1. Purpose of the test
Under the combination of specific machine tools, tool holders, tools and tool lengths, select the appropriate amount of cutting per tooth and axial depth. Observe the machining process by using a series of different cutting speeds and radial depths. Judging from the quality of the machined surface, the occurrence of machining chattering occurs to find the same part machining quality (smooth cutting, no chattering), and the material cutting rate reaches the maximum milling parameter.
2. Test conditions
CNC machine tool: MIKRON UCP710 five-axis machining center, spindle maximum speed 18000r/min, power 15kW, maximum feed rate 20m/min;
Tool: FETTE LW225 carbide end mill with diameter ï†10mm, length 66mm, 2 teeth, 30ï‚° helix angle, recommended by the tool supplier: Maximum cutting speed Vc800mm/min when machining low silicon content aluminum alloy The maximum feed Fz is 0.115mm/tooth, the maximum axial depth of cut is ap15mm, and the corresponding radial depth of cut is 5mm. This tool is one of our most commonly used tools;
Fixture: HSK holder, Φ42mm;
Processing material: LF5 aluminum alloy, this material is our most commonly used processing material;
Coolant: Blasocut 2000 Emulsion
3. Test method
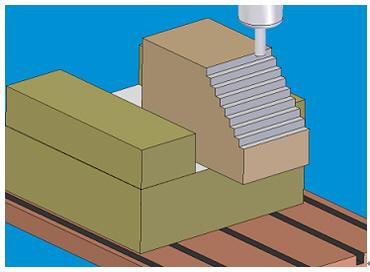
Prepare the workpiece with the outer dimension of 80mm×100mm×150mm, and put the workpiece into the vise. The length of the 80mm is 40mm higher than the vise. After the tool is loaded into the HSK tool holder, the length is 35mm, and the workpiece is processed into a height of 8mm and a width of 1mm. Steps, see Figure 1.

figure 1
Determine the spindle speed range of the test: According to the maximum cutting speed, the maximum speed that the tool can withstand is 25478r/min. According to the performance of the machine and the experience of the peacetime, we choose the spindle speed in the range of 7000~14000r/min, corresponding to The cutting speed is 220 to 440 mm/min.
Determining the depth of cut and the amount of feed per tooth: During the entire test, the axial depth of cut and the amount of cut per tooth were kept constant. We chose ap8mm and Fz0.1mm/tooth, and the radial depth of cut can be ae8mm. The constant feed per tooth means that the feed rate of the tool will change when the spindle speed changes. This is mainly due to two factors. First, each tool can have the same chip load. It is the influence of the feed amount per tooth on the surface roughness, and the feedability per tooth of each step remains the same, which is comparable.
Write a test program: perform a series of parallel milling steps at different heights. The spindle speed is increased from one step to the next, and is divided into 8 steps, from 7000r/min to 14000r/min in increments of 1000r/min. The radial depth of cut increases from 3mm to 8mm, increasing by 1mm each time after one cycle.
Evaluate cutting: Listen and then observe. The sound from different steps can feel where the flutter occurs. Then, after the cutting is completed, the surface quality of the workpiece is checked. The workpiece is required to be placed on the mountain. After the completion of a step, the workpiece is taken out to determine whether the surface is smooth, slightly fluttered or severely fluttered. After recording, return the workpiece to the original clamping position and continue processing.
Third, test results and analysis
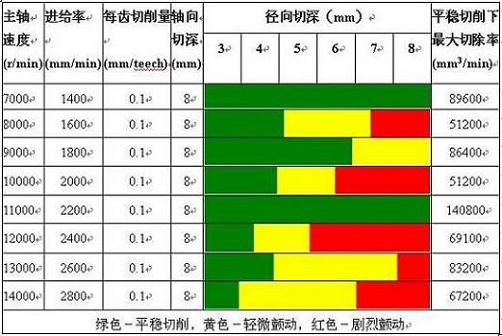
The test results are shown in Table 1. Green indicates smooth cutting, yellow indicates slight vibration, and red indicates severe vibration. It can be seen that when the radial depth of cut is 3 mm, all the steps show stable cutting. When the radial depth of cut is 4 mm, some steps begin to show slight vibration, when the radial depth of cut increases sufficiently high. Some work steps will cause severe vibrations.

This phenomenon is common in machining, mainly because each spindle, tool holder and tool system has several sets of frequencies. When the frequency of the impact vibration generated by the tool cutting workpiece is close to the natural frequency of these systems, it will be generated. The phenomenon of chattering causes surface ripple and affects surface roughness. Vibration is not a defect of the machine tool, it is a physical defect and is inevitable. There is no doubt that the vibration will cause surface ripple, because the feed per tooth used in the whole test is constant. If no chattering occurs, the surface roughness of all the steps should be basically the same. This is also the main reason why the feed per tooth must be kept constant during the test.
It can also be seen from the test results that when the spindle speed is 14000r/min, the material removal rate during smooth cutting is 67200mm3/min, and when the spindle speed is 11000r/min, the material removal rate during smooth cutting is 140800mm3/min. That is, although it seems that a higher spindle speed is used, the processing efficiency at this time is not the highest, in other words, the combination of cutting parameters is not optimal.
In the test, we obtained two smooth cutting spindle speeds of 7000r/min and 11000r/min, and their material removal rates were 89600mm3/min and 140800mm3/min, respectively, which was better. The natural frequency of the system consisting of machine tools, tools, and tool holders is often unknown in advance. If only the cutting parameters are selected based on the tool life parameters and machine parameters, such a result cannot be obtained.
Fourth, the conclusion
In the test of a machine tool, tool holder, tool, tool length, workpiece material, cutting amount per tooth and axial feed, the optimum speed for smooth cutting was found, and its speed did not reach its maximum. Therefore, it is unrealistic to increase the metal removal rate and increase the rotation speed. It is most practical to find a reasonable combination of parameters. It should be noted that if any of the above conditions changes, the result will change. The reader can find reasonable cutting parameters (with high metal removal rate) according to his actual situation, which will improve processing. Quality and shortening processing time are of great significance.
A ceiling lamp is a type of light fixture that is mounted on the ceiling and provides overhead lighting in a room. It typically consists of a base or canopy that is attached to the ceiling, and a shade or diffuser that covers the light source. Ceiling lamps can come in various designs and styles, including pendant lights, chandeliers, flush mount lights, and semi-flush mount lights. They can be used in a variety of spaces, such as living rooms, bedrooms, kitchens, and dining rooms, to provide general illumination and enhance the overall aesthetic of the room.
Ceiling Lamp ,Led Ceiling Light,Ceiling lighting,Ceiling Mounted Light
Zhongshan Seekyo Lighting CO., Ltd. , https://www.seekyolighting.com