(1) Polymer cement based waterproof material
1 material
The polymerized cement-based (JS) type waterproof coating is a two-component liquid material prepared by adding a polymer emulsion to an additive and a powder containing cement as a main component, and is uniformly mixed and stirred according to a predetermined ratio, and is formed by curing on the base layer. Waterproof layer. Polymeric cement-based (JS) waterproof coatings are classified into type I, type II, and type III, and are volatile curing type waterproof coatings. This waterproof system is preferably used in an environment where there is no long-term water in the room, and can be used in combination with other materials in roofing works.
2 Construction sequence
Cleaning and inspection of the base layer → repairing the base layer → detailing the joints of the components → construction of the additional layer of the yin and yang corners → painting the first coat of paint → painting the second pass of the waterproof coating → brushing the surface coating → coating quality inspection → closed water test.
3 Construction points
(1) Clean and inspect the grassroots:
1 The waterproof base should be cleaned to ensure that the base is free of oil, dirt, debris and dust.
2 Check the base layer: whether there are holes in the base layer, unevenness, whether the pipes passing through the floor are dense, the distance from the horizontal pipe to the base surface, and whether the base layer is loose.
(2) Repair the grassroots:
1 The base layer has irregularities, looseness, holes, etc., first loosen the loose parts and high parts, and then level with 1:3 cement mortar.
2 If there is looseness in the root of the base pipe, the loose base should be removed and repaired with cement mortar or rigid plugging material.
3 If the yin and yang angle of the indoor waterproof base layer has no arc, it should be applied with polymer cement mortar.
(3) Treatment of the detailed structure of the waterproof layer
1 The floor drain or the perimeter of the pipe is filled with sealant;
2 Extend the flat and façade pipes, and the area around the floor drain and the yin and yang corners should be coated with an additional waterproof coating before the large-surface waterproof layer is applied.
1) Additional layer width around the pipe: the height of the additional layer at the pipe part is not less than 100 mm, and the width of the additional layer at the waterproof base layer is not less than 200 mm.
2) The width of the floor drain additional layer is 300mm, the width of the additional layer extending into the floor drain is not less than 100mm, and the width of the additional layer around the floor drain is not less than 200mm.
3) The additional layer width of the yin and yang corners is 300mm, and the junction is 150mm below the middle line.
3 If the additional layer is designed with a mesh reinforcement layer, the mesh cloth should be soaked after being laid, and no wrinkles should appear.
(4) Waterproof coating requirements:
1 Primer construction:
Ingredients:
The person is responsible for the material preparation. When operating, pour the liquid material and water into the mixing tank according to the requirements of the ratio. Pour the powder into the added barrel under the constant stirring of the agitator, stir for at least 5 minutes, stir evenly. It is a slurry-like powder-free grain; it is evenly applied with a roller brush or a brush to apply the primer. It should not be exposed to the bottom. The thickness of the coating is 0.2-0.3 mm. After 8 hours, the coating is cured and not sticky. Brushing the next process;
2 The first coating construction:
The person is responsible for the material preparation. When the operation is carried out, the liquid material and the water are poured into the mixing tank according to the requirements of the ratio. The powder is poured into the added barrel under the constant stirring of the agitator, and stirred for at least 5 minutes, and the mixture is evenly stirred. It is slurried and free of powder. The roller brush or brush should be applied evenly to the primer, and the primer should not be exposed. The thickness of the coating is 0.4-0.5 mm. After 8 hours, the coating is cured and not sticky, so that the next process can be applied.
The first coating construction: use the roller brush, brush, rubber scraper to evenly paint the primer, no bottom, the general material coating thickness is 0.4 ~ 0.5 mm, the coating is required to be cured and not sticky, in order to paint a process;
3 Second or third coat of paint construction:
The person is responsible for the material preparation. When operating, pour the liquid material and water into the mixing tank according to the requirements of the ratio. Pour the powder into the added barrel under the constant stirring of the agitator, stir for at least 5 minutes, stir evenly. It is powdery and powder-free; it can be evenly coated with brush or brush during construction. It should not be exposed. The thickness of the coating is 0.4~0.5 mm. After 8 hours, the coating is cured and not sticky. Brushing the next process;
Note: The coating construction requires multiple paintings (not less than three times) and direct thickness requirements.
(5) Apparent quality inspection:
1 Check the quality of the waterproof layer before the water shut-off test. The waterproof layer of the paint should not have bubbles, delamination or blockage.
2 Before the water shut-off test, the paint must be cured before it is finished, so that it is not sticky, it can not be peeled, and the corners and roots should be dry.
(6) Closed water test:
After the waterproof layer is solidified, the water is stored for 24 hours, and the water level is 2 cm above the highest point, so that no leakage is acceptable.
(7) Construction of the protective layer on the upper part of the waterproof coating:
After the first water shut-off test is passed, the surface layer construction can be carried out, and the finished product protection is required. The waterproof layer should not be damaged during the construction of the surface layer and the protective layer.
(8) Second closed water test:
After the protective layer or surface layer is applied, the water shut-off test should be carried out again. If there is leakage, the protective layer should be removed to check the waterproof layer until there is no water leakage.
(2) Construction technology of acrylic acid waterproof coating
1 waterproof material
See the material introduction for waterproof materials. Acrylic waterproof coating is a volatile curing material that forms a waterproof coating layer by evaporation of water. The waterproof system is adapted to the environment without long-term water soaking in the room, and the pure acrylic acid waterproof coating system is adapted to the waterproof engineering of the metal roofing layer.
2 Construction sequence
Cleaning and inspection of the base layer → repairing the base layer → detailing the joints of the components → painting the additional layer of the yin and yang corners → painting the first coat → brushing the second pass of the waterproof coating → brushing the surface coating → coating quality inspection → closing the water test.
3 Construction points
(1) Clean and inspect the grassroots:
1 Remove the waterproof base layer after the structural level such as the surface layer, and make sure that the base layer is free of oil, dirt, debris, and dust.
2 Check the base layer: whether there are holes in the base layer, unevenness, whether the pipes passing through the floor are dense, the distance from the horizontal pipe to the base surface, whether the base layer is loose, etc.
(2) Repairing the grassroots
1 The base layer has irregularities, looseness, holes, etc., first loosen the loose parts and high parts, and then level with 1:3 cement mortar.
2 If there is looseness in the root of the base pipe, the loose base should be removed and repaired with cement mortar or rigid plugging material.
3 If the yin and yang angle of the indoor waterproof base layer has no arc, it should be applied with cement mortar.
(3) Treatment of the detailed structure of the waterproof layer
1 floor drain or the perimeter of the pipe is filled with sealant;
2 Extend the flat and façade pipes, the area around the floor drain, and the yin and yang corners should be coated with a waterproof coating layer before the large-surface waterproof layer is applied. The thickness of the waterproof coating layer is 1mm.
1) Additional layer width around the pipe: the height of the additional layer at the pipe part is not less than 100 mm, and the width of the additional layer at the waterproof base layer is not less than 200 mm.
2) The width of the additional layer of the floor drain is 300mm, the width of the additional layer extending into the floor drain is not less than 100mm, and the width of the additional layer around the floor drain is not less than 200mm.
3) The additional layer width of the yin and yang corner is 300mm, and the junction is 150mm below the center line.
3 If the additional layer is designed with a mesh reinforcement layer, the mesh cloth should be soaked after being laid, and no wrinkles should appear.
(4) Paint waterproof coating
1 The first coating construction: use the roller brush, brush, rubber scraper to evenly apply the primer, no bottom, the general material dosage is 1 kg/m2, the coating thickness is 0.4 mm, the coating is required to be cured and not sticky. In order to apply the next process;
2 second coating construction:
Use a roller brush, a brush, a rubber scraper to evenly apply the primer, no primer, the general material dosage is 1.25 ~ 2.5kg / m2, the coating thickness is 0.5 ~ 1 mm, the coating is required to be cured and not sticky, to be coated Brush a process;
3 third coating construction:
Use a roller brush and a brush to evenly apply the primer, without the bottom. The general material dosage is 1.25~2.5 kg/m2, the coating thickness is 0.5~1 mm, and the surface coating can be brushed with a small amount of water to make the surface smooth and smooth.
Note: The coating construction requires multiple paintings (not less than three times) and direct thickness requirements. For every 1 mm film, the coating is about 2.5 kg/m2.
(5) Apparent quality inspection:
Before the water shut-off test, check the quality of the waterproof layer. The waterproof layer of the paint should not have bubbles, delamination or blockage. Before the water-tight test, the paint must be solidified before the finish, so that it is not sticky, not peeling, corners and The root of the tube should be dry.
(6) Closed water test
After the waterproof layer is solidified, the water is stored for 24 hours, and the water level is 2 cm above the highest point, so that no leakage is acceptable.
(7) Construction of the protective layer on the upper part of the waterproof coating:
After the first water shut-off test is passed, the surface layer construction can be carried out, and the finished product protection is required. The waterproof layer should not be damaged during the construction of the surface layer and the protective layer.
(8) Second closed water test:
After the protective layer or surface layer is applied, the water shut-off test should be carried out again. If there is leakage, the protective layer should be removed to check the waterproof layer until there is no water leakage.
(3) One-component polyurethane waterproof coating construction
1 waterproof material
The one-component polyurethane waterproof coating is cured by absorbing moisture from the air and is free from harmful solvents. The waterproof material should not be used in an exposed environment, and it is suitable for use in a long-term soaking environment such as a basement, an upper roof, a bathroom, or a pool.
2 Construction sequence
Clean and inspect the base layer → repair base layer → detail member node treatment → construction and painting of the additional layer of the yin and yang corner parts → brush the first coat of paint → brush the second time waterproof coating → brush the surface coating → 8 paint quality inspection → close Water test.
3 Construction points
(1) Clean up and inspect the grassroots
1 Remove the waterproof base layer after the structural level such as the surface layer, and make sure that the base layer is free of oil, dirt, debris, and dust.
2 Check the base layer: whether there are holes in the base layer, unevenness, whether the pipes passing through the floor are dense, the distance from the horizontal pipe to the base surface, whether the base layer is loose, etc.
(2) Repairing the grassroots
1 The base layer has irregularities, looseness, holes, etc., first loosen the loose parts and high parts, and then level with 1:3 cement mortar.
2 If there is looseness in the root of the base pipe, the loose base should be removed and repaired with cement mortar or rigid plugging material.
3 If the yin and yang angle of the indoor waterproof base layer has no arc, it should be applied with polymer cement mortar.
(3) Treatment of the detailed structure of the waterproof layer
1 floor drain or the perimeter of the pipe is filled with sealant;
2 Extend the flat and façade pipes, the area around the floor drain, and the yin and yang corners should be coated with a waterproof coating layer before the large-surface waterproof layer is applied. The thickness of the waterproof coating layer is 1mm.
1) Additional layer width around the pipe: the height of the additional layer at the pipe part is not less than 100 mm, and the width of the additional layer at the waterproof base layer is not less than 200 mm.
2) The width of the floor drain additional layer is 300mm, the width of the additional layer extending into the floor drain is not less than 100mm, and the width of the additional layer around the floor drain is not less than 200mm.
3) The additional layer width of the yin and yang corner is 300mm, and the junction is 150mm below the center line.
3 If the additional layer is designed with a mesh reinforcement layer, the mesh cloth should be soaked after being laid, and no wrinkles should appear.
(4) One-component polyurethane waterproof coating
1 Primer construction:
The paint is evenly coated on the base layer with a rubber scraper, and the thickness is uniform, and the thickness of the paint is 0.5 mm;
2 second coating construction:
After the first pass is completely cured (not less than 24 hours), the second coat is applied, and the paint is evenly coated on the base with a rubber scraper. The direction is perpendicular to the first time, and the paint thickness is 0.5. Mm;
3 third coating construction:
After the second pass is completely cured (not less than 24 hours), the third coat is applied, and the paint is evenly coated on the base with a rubber scraper. The direction is perpendicular to the second pass, and the paint thickness is 0.5. Mm;
Note: The coating construction requires multiple paintings (not less than three times) and direct thickness requirements.
(5) Quality requirements
1 Check the quality of the waterproof layer before the water shut-off test. The waterproof layer of the paint should not have bubbles, delamination or blockage.
2 Before the water shut-off test, the paint must be completely cured, so that it is not sticky, it can not be peeled, and the corners and roots should be dry.
(6) Closed water test
1 After the waterproof layer is solidified, the water is stored for 24 hours, and the water level is 2 cm above the highest point, so that no leakage is acceptable.
2 After the construction of the protective layer or the surface layer, the water shut-off test should be carried out again. If there is leakage, the protective layer should be removed to check the waterproof layer until there is no water leakage.
3 After the first water shut-off test is passed, the surface layer construction can be carried out, and the finished product protection is required. The waterproof layer should not be damaged during the construction of the surface layer and the protective layer.
[Follow the WeChat public number "Jiuzheng Coating Network"; pay attention to surprises, scan code to see "what is the paint sales? Absolutely! 》ä¹æ£æ¶‚料网交æµç¾¤]
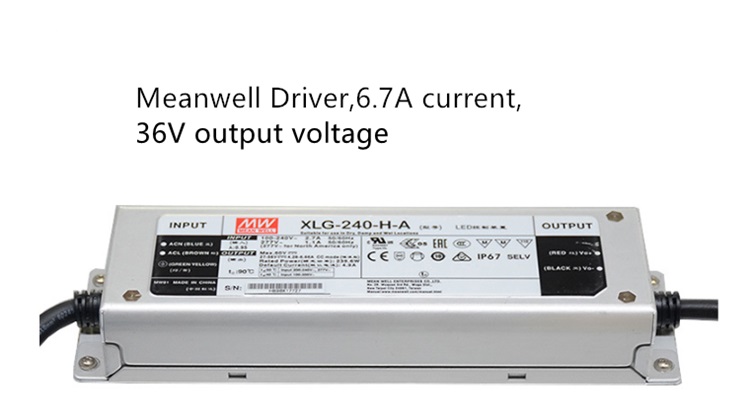
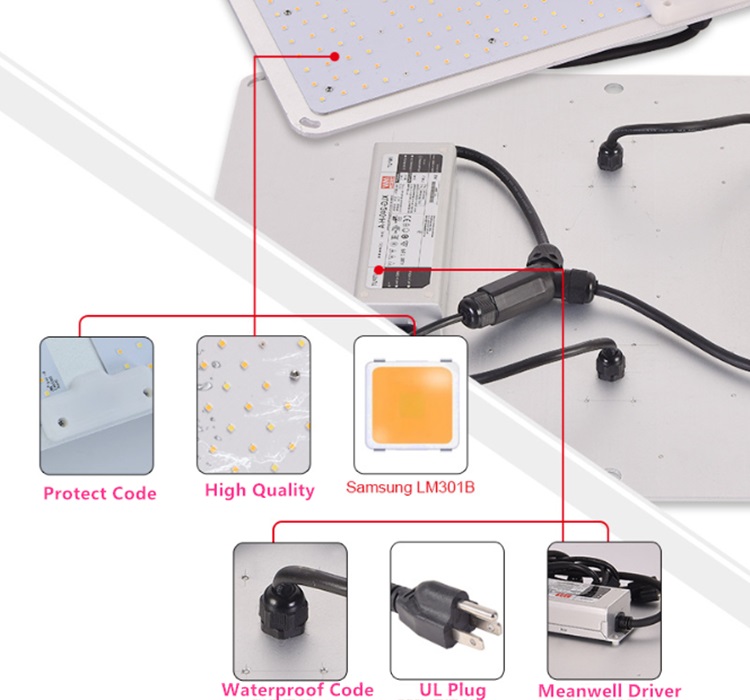
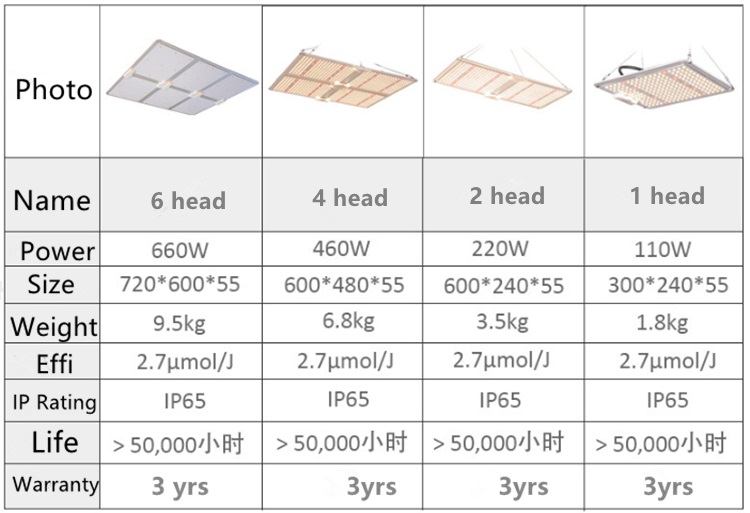
Grow Light Led 600w, with 6pcs boards, each board 350pcs led, high power grow light works well for large area, such as grow tent, hydroponic, We have samsung LM301B/LM301H led, also Samsung 5730 led, meanwell driver/normal driver available here.
Application:
Quantum board LED grow lights is a great ideal for all kinds of indoor garden plants: lettuce, orchid, organic herbs, pepper, strawberries, succulent, hydroponic, medical plants.


Hydroponic Grow Lights,Full Spectrum Led Lights,Succulent Grow Light,Sun Lamp For Plants
Shenzhen Wenyi Lighting Technology Co., Ltd , https://www.wygrows.com